|
There are a great many seismic stations around the entire world. Some areas are densely populated with stations and others are in desperate need of seismic monitoring. Gathering seismic data from stations around the world, especially from the United States, is very easy.
This page will show you how to gather seismic data, particularly from stations within the United States. There are 13 steps you need to practice. However, once you get the hang of it, seismic data retrieval should be virtually instantaneous. This page will also teach you how to retrieve seismic audio. The positives of learning how to download seismic data include personal monitoring of your local area, monitoring of volcanic activity, learning what certain activity looks like in comparison to another area, and much more! Although this may seem convoluted at first, this is the best way to monitor for potential unrest at volcanic and tectonic hazard areas from the comfort of your own home. Possibilities like this were not around just a couple decades ago. Thanks to ever increasing technology, amateur seismology is now a possibility! You now can bypass the middleman and view helicorders, seismograms, spectrograms, etc... by retrieving seismic data directly from the instruments themselves! |
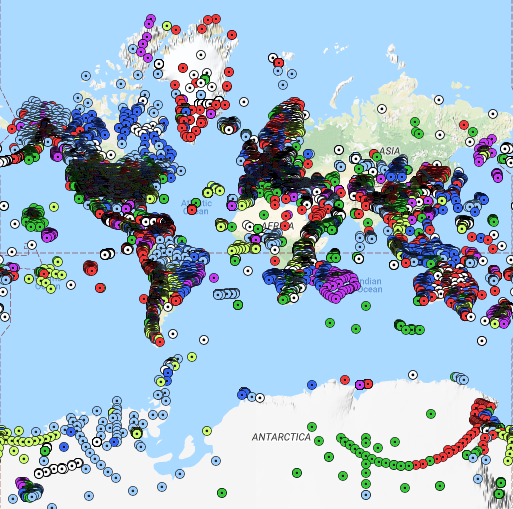
The seismometers of the world. 105,639 to be exact. Some active and some inactive.
|
Retrieving Seismic Data
- Visit the IRIS Gmap. CLICK HERE to visit it now.
- Click the "Location Box" option and draw the boundary with your cursor.
- Press “Update Map”.
An example of this is shown below:
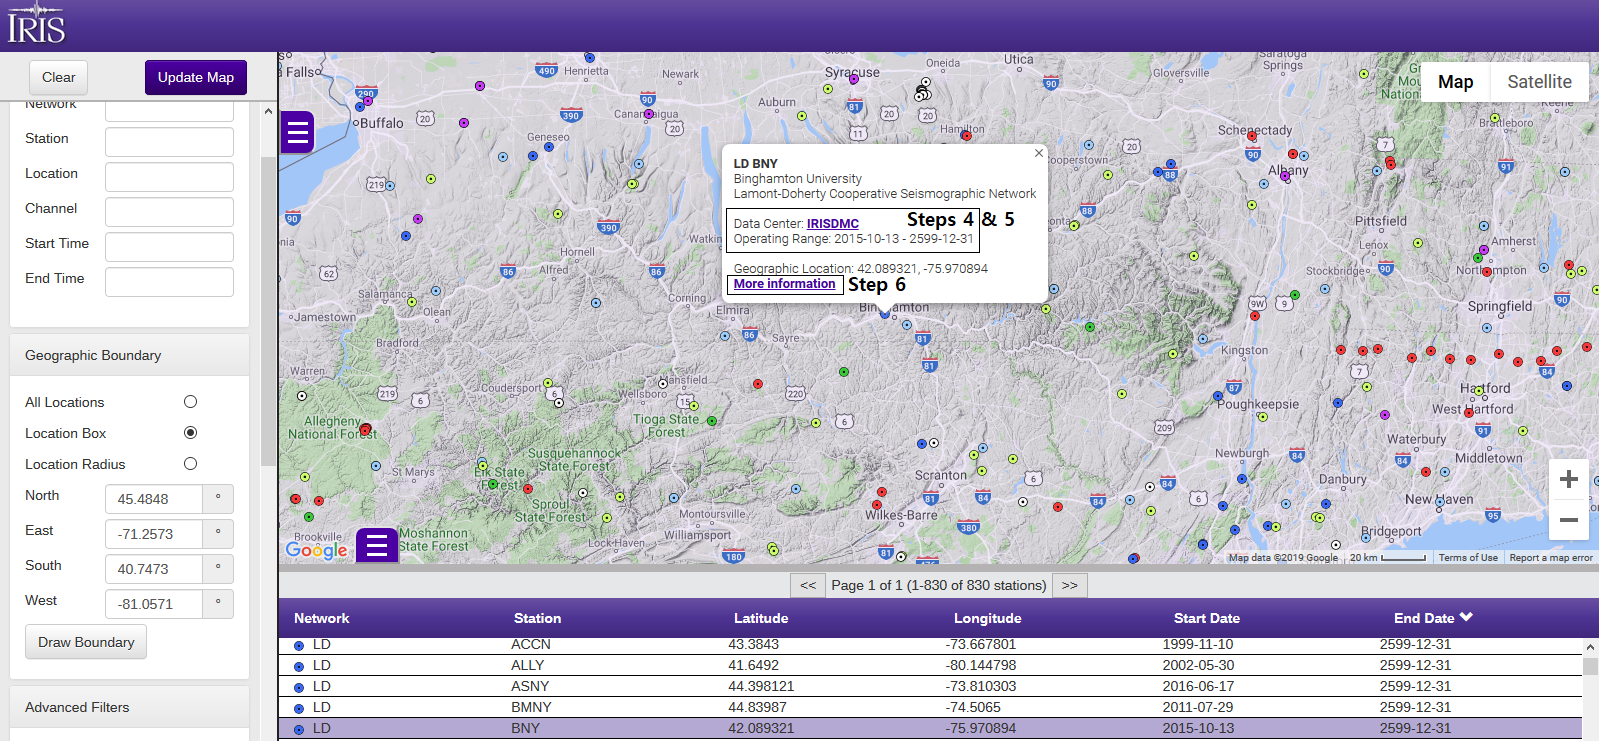
4. Select a seismic station closest to the area of your interest. As you can see below, a station tab will open. If the date period is past, for example with an end year of 2017, the data for that station is no longer being recorded and data will only be available for the time range it states. However, if a station is down or undergoing maintenance, data will not be available for the time period you want. It all depends on how the station is fairing during your desired time period for data retrieval.
5. Next, look at the data center. This will be the source you use to download the seismic data. For the different data centers, links are provided here:
If it says “IRIS DMC”, please CLICK HERE to use the IRIS Data Select tool.
If it says “NCEDC”, please CLICK HERE to use the NCEDC Data Select tool.
If it says “SCEDC”, please CLICK HERE to use the SCEDC Data Select tool.
If it states a datacenter that you cannot find, shoot me an email at [email protected] and I will gather the data for you.
6. Next, click “More Information”.
An example of these steps can be shown in the image below:
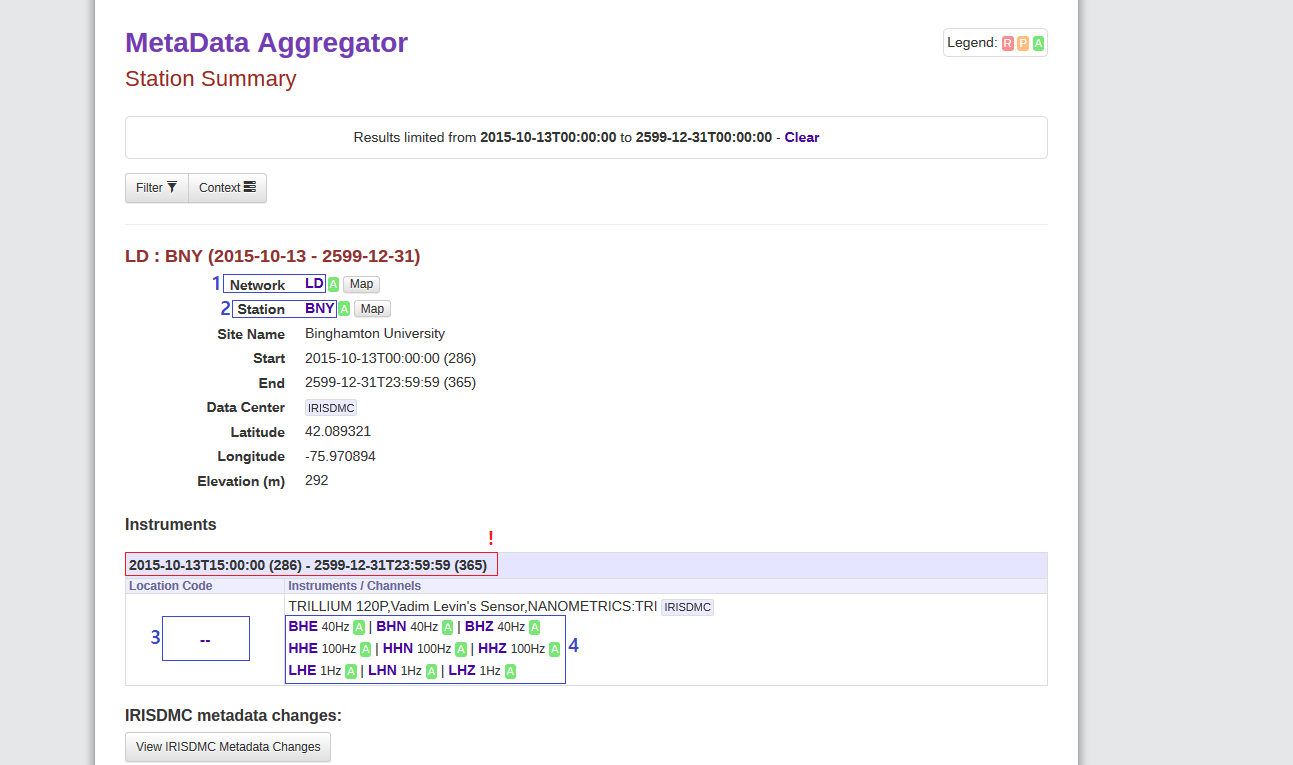
7. You notice the page that popped up? That is the metadata information for that particular station. First, make sure you look at the most recent time period which will always be closer to the top. This is labeled in the image below with a “!”.
8. Next, in order to download data, you must know the network, station, location, and channel codes. Sound difficult? Nope! Look at the 4 blue circles in the image below. “1” is the network code, “2” is the station code, “3” is the location code, and “4” are the channel codes. For beginners, I suggest only using “BHZ”, “HHZ”, “EHZ”, or “SHZ” for viewing data. The other channels can be dealt with at a different time as your skills progress.
9. Notice how the data center says “IRIS DMC”? Well, now it is time to learn how to use the data select tool!
An example of this is shown via the image below:
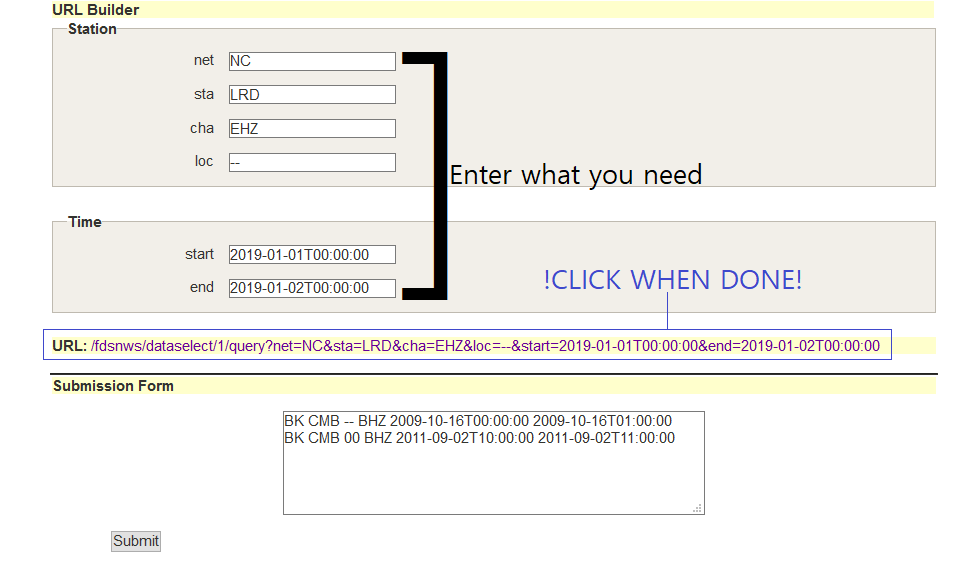
10. Next, take a look at the animated GIF below. Notice how you must transpose the network, station, location, and channel code to the data select tool? Do that now.
11. Next, enter your desired time period. It MUST be in this format: YYYY-MM-DDTHH:MM:SS and the time frame is always read in UTC. Notice there are no spaces and there is a capital T separating the date from the time. Sadly, this station was down during this time frame. So, if you wish, try this out with other stations and other time periods. Practice makes perfect!
12. Next, make sure the format is in .mseed format. You can use SACzip if you wish, but beginners should start with the .mseed format. The .mseed format will carry a smaller file size and is just as good as SAC.
13. Last, but not least, click the link you created and it will download the data for you. Then open the saved .mseed file in any seismic analysis program you wish. I suggest using the program SWARM for basic to moderate seismic analysis. CLICK HERE for the SWARM download or CLICK HERE to understand how to use the basics of the program.
An example of these steps are shown via the animated GIF below:
Now if you see the main data center is NCEDC or SCEDC, please use the appropriate URL builders for those data centers. For example, the CI network is in the SCEDC database and the NC network is in the NCEDC database. You can see in the image below that both data centers work almost just like the IRIS one does. The NCEDC dataselect tool, which is shown in the image below, is an exact copy of the SCEDC dataselect tool. Well, at least when it comes to data retrieval from those data centers.
BONUS: Seismic Audio Retrieval
Ever wanted to hear what seismic data sounds like? Well, now you can with the IRIS Time Series tool! CLICK HERE to visit that now.
Simply visit that link and enter the same parameters you did for the data select tools mentioned earlier on this page. Sadly, this only works for stations within the IRIS DMC database.
There are two other things you need to do here. You may also use the animated GIF at the end as an example.
1. Look for the "Format" section. Select "audio".
2. Next, look for "Audio Sample Rate (samples per sec):". The setting I find best is 8000 (no comma). This will tell the tool how fast you want the audio. You may need to mess around with this option a few times. Depending on the length of the data you want to hear, it may need a smaller or larger audio sample rate. I suggest going no lower than 3000. An audio rate that is too low will not allow you to hear the data. All seismic audio is heard better when sped up. This is mainly to use during long periods of time, for example during earthquake swarms or long durations of volcanic tremor.
3. Then, of course, click the link at the bottom of that page once all parameters have been entered. This will download the seismic data audio in .wav format.